No Guts No Glory “Rat Rod” AR15 Pistol Build
Major Pandemic 08.22.16

Folks who have built a few AR15s are bound to have extra parts lying around. All it takes is a tipping point of that one extra part to start off a new AR15 build, because after all you already have most of the parts–right? In this case, I had just received a 7.5″ AR15 pistol barrel from MicroMOA to try and needed a build to start testing.
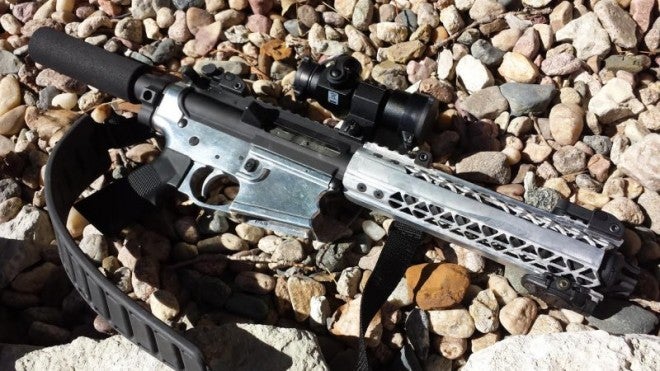
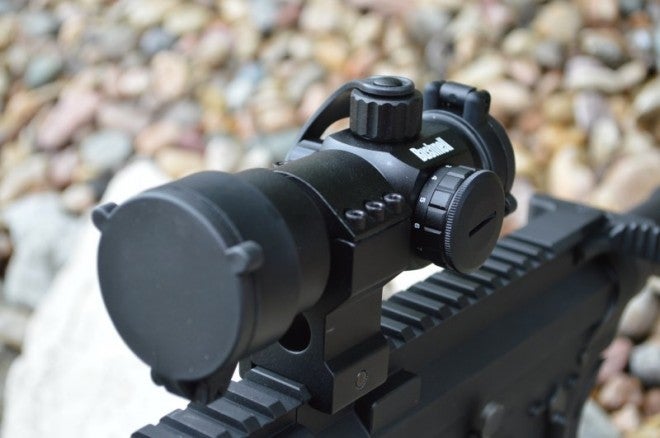
You can generally find forged AR uppers and lowers selling for well under $100 and blemished units for around half that. I reached into my pile of blemished Anderson Rifles $40 uppers and selected one, grabbed a new complete Sharps Reliabolt Bolt Carrier group they had provided for review, a random charging handle, a used set of YHM fold-up sights I’d picked up at a gun show, and a Bushnell TRS-32 (I had scored six of these for $69 each). I also had a Mission First Tactical Tac Light, which is perfect for this type of pistol CQB build.
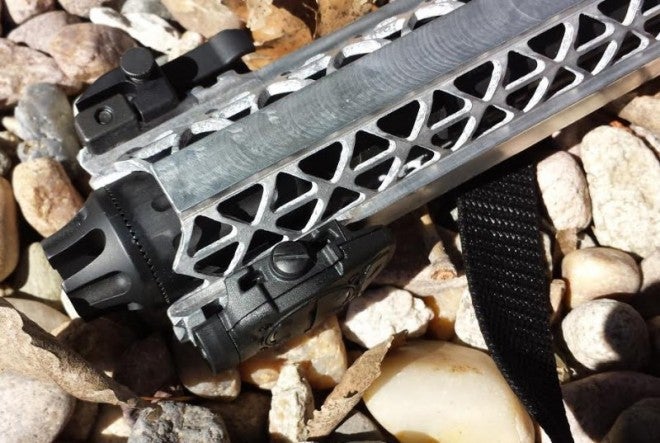
I was short a few components to complete the upper, including a muzzle device and handguard. PWS was nice enough to provide one of their PWS CQB compensators (which after testing became the one and only brake/compensator I recommend for an indoor-fired CQB or home defense rifle/pistol).
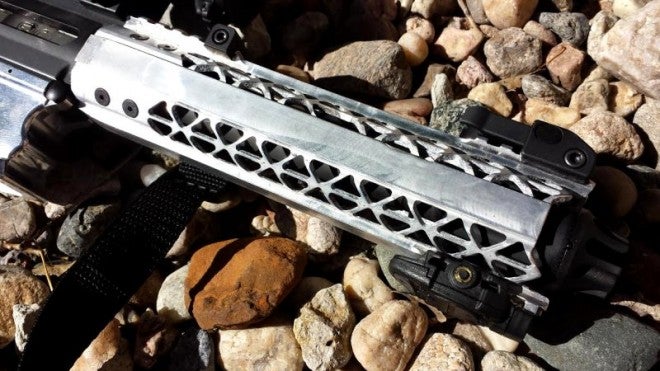
All I had lying around for handguards were a couple of longer ones (more than 12″ long), so I was faced with a decision to impatiently wait a couple weeks for a handguard or create a unique “rat rod” handguard using my Little Machine Shop Mill. I elected for the latter, grabbed a beat-up and well-used Black Rain Ordnance quad rail, and began transforming it into an extended pistol-length 9″ handguard.
It was a big task to cut and mill down the rails off the hand guard, but it was fitting that it happened on this build since I’d previously used the same mill to complete the 80% Matthews Carbine Company lower receiver. The MCC lower build was completed with a PWS billet buffer tube and ALG trigger group.
Custom Milled Black Rain Ordnance Hand Guard
The first step was removing as much of the anodizing as possible. This was certainly not required, but it would generate the look I desired to match the naked Matthews Carbine lower. Four or five coats of Heavy Duty Easy-Off oven cleaner removed the anodizing, with a rinse and some scrubbing between coats. Any little problem spots were hit with a stainless brush in my Dremel tool.
I used a hacksaw to cut the handguard roughly to length, then milled unwanted picatinny rails off of each side and also squared up my hacksaw cut at the front end.
To get that “been there and done that” look, I took a file to all corners to radiused them, polished the entire handguard with a Scotch-Brite pad, applied a final coat of oven cleaner, rinsed that off, and then polished the entire handguard with Flitz by hand and with a Dremel.
I think it turned out pretty cool and it is really comfortable to hold after all that polishing.
MicroMOA Artisan Arms Barrel
MicroMoa exclusively uses Fedderson barrels profiled and chambered by Artisan Arms. The big deal about Feddersen blanks is that they feature the hair-splitting SPR (Single-edged Polygonal Rifling) and a special lapping process. I have seen how good their 10/22 barrels are, so you know I was excited to test a 5.56 NATO AR15 pistol barrel featuring the same rifling.
According to Artisan Arms and Feddersen, you need to break in the barrel with around 300 rounds. After that, the accuracy starts to drastically increase. With this build, those first 300 rounds seemed to fly by quickly.
Initial accuracy was tested with my 8x-32x Nikon Monarch at 100 yards, with groups of around 2″ with Hornady Match 72-grain Custom rounds. PMC bronze ammo produced 3″ 100-yard groups.
After a couple hundred rounds had been fired, accuracy began to get substantially better. With the same scope, I fired 1.13″ and 1.25″ groups with the same box of Hornady Match Custom 72-grain ammo, and almost all of my PMC Bronze 223 ammo was giving me sub-2″ groups.
Before you yawn at this accuracy, remember that this is a pistol with only 7.5 inches of barrel.
I was more impressed when I started banging away on the 12″ steel at 300 yards with a non-magnified Bushnell TRS-32 red dot.
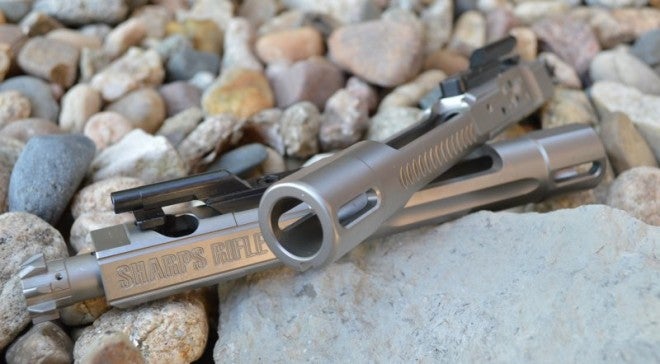
Sharps Balanced Carrier and Reliabolt
A while back, I reviewed the Sharps Reliabolt and was impressed with its thoughtful design. Beyond Chrome and NiBo coatings, the AR15/M4 bolt has not really changed since it was initially designed–until the Sharps Reliabolt. Sharps engineers looked at all the potential bolt and carrier failure points and redesigned their Reliabolt to improve reliability in extreme wear, impacted weapon, and alignment situations.
I personally have never had any issues with even standard phosphate-finished bolts with proper lube, but I can understand how the Sharps design would greatly enhance reliability and continue operation in near-catastrophic weapon conditions.
Sharps later released their Balanced Carrier, which was created to prevent carrier tip, assure proper cycling alignment, reduce receiver and carrier wear, and provide smooth operation even in harsh conditions without the need for lubrication. Sharps is using the same NP3 Nickel Teflon coating for its lubricity and easy cleaning properties. The carrier and bolt can literally be cleaned with soap and water. Coat the carrier with any of the newer lubes such as Frog Lube and a soft cloth, and you’re done cleaning it.
Sights and Optics
The YHM flip-up sight set and Bushnell TRS-32 performed perfectly and reliably. I do not anticipate a need to use the YHM pop-up billet sights as I have never had an issue with any of my four TRS-32 red dot sights, but they are battery-operated and I am fairly absent-minded, so one of these days I just might need those iron sights.
The Bushnell TRS-32 has 11 brightness settings. Setting 11 is bright enough for sunny days outside, but I would like to see this sight offer illumination settings even dimmer than their current lowest setting, for night work–maybe a night vision setting. For the price, quality, and included lower 1,3 co-witness ring, the Bushnell TRS-32 is one of the best red dot buys on the market along with its smaller sibling, the TRS-25.
Other Tidbits
Instead of having a single point sling setup to continually whack me in the balls, I elected for a two-point sling mount on the PWS Billet Buffer Tube and a Fortis single point picatinny mount on the handguard just forward of the upper receiver. This setup makes for a controllable and easily-carried pistol package that does not abuse my cojones every time I drop it from my shoulder or run from point A to point B.
Final Thoughts
This was a really fun build composed of spare parts and some great top-end parts. I will likely move the great guts of this gun over to a more refined build sometime, instead of this random rat-rod build.
The parts worked beautifully together. I am sold on the performance of MicroMOA barrels, and I really like the PWS CQB brake, which has a crazy cool look. The Sharps Reliabolt and balanced carrier worked great–though I have certainly not challenged it with anything that would test the super-tough design features in the first 600 rounds. I also like the YHM sights and TRS-32 red dot.
This build was more or less a quick prototype to see if the whole AR15 pistol concept was worth my time, and I can say it absolutely is. I really like the forend I created, so I will need to work up another build to use this handguard. Look for more AR15 pistol builds and reviews coming. Most will probably feature Fedderson profiled barrels from Artisan Arms and MicroMOA.
